Add a size chart to product pages
On this page
- Creating a size chart page
- Adding the size chart to your theme
- Creating a size chart page
- Creating a size chart snippet
- Setting up a size chart specific to a vendor or product type
- Using a different language or changing the ‘Size chart’ text
Note
If you use a free theme from Shopify, then you might be able to reach out to Shopify’s Support team for basic technical assistance with this tutorial.
If you need more advanced customization but don’t have experience developing websites with HTML, CSS, and JavaScript, then consider hiring a Shopify Expert.
Learn more about Support for themes.
If you sell clothing items that require customers to know their size before they make a purchase, you can add a custom size chart to your product page.
All products that require reference to the size chart must have a Size option:
Caution
This tutorial doesn’t work for Narrative or the non-sectioned version of Brooklyn. If you use non-sectioned Brooklyn, then you can follow this customization guide that isn’t supported by Shopify.
Additionally, size chart tables are not responsive to all devices. They can be cut off the side of the page on mobile devices if too many columns of information are added.
Sectioned and non-sectioned themes
Note
The steps for this tutorial differ depending on whether you are using a sectioned or a non-sectioned theme. A sectioned theme is a newer theme that lets you drag and drop to arrange the layout of your store’s pages.
To figure out whether your theme supports sections, go to the theme’s Edit code page. If there are files in the Sections directory, you are using a sectioned theme. Non-sectioned themes were released before October 2016, and do not have files in the Sections directory.
If you are using a sectioned theme, click the Sectioned themes button and follow the instructions. If you are using an older, non-sectioned theme, click the Non-sectioned themes button and follow the instructions.
Creating a size chart page
- Desktop
- iPhone
- Android
- From your Shopify admin, go to Online Store > Pages.
- Click Add page.
- Enter
Size chartfor the page title:
- In the Content box, create a table that contains your size chart information. Customize the table to look the way you want it to:

- In the Visibility section, make sure the page is set to Visible.
- Click Save.
Adding the size chart to your theme
- Desktop
- iPhone
- Android
- From your Shopify admin, go to Online Store > Themes.
- Find the theme you want to edit, and then click Actions > Edit code.
- In the Sections directory, click to open your
product-template.liquidfile. - Add a Size chart button by pasting the following code above the Add to cart button:Copy
{% if product.options contains 'Size' %} <a class="btn size-chart-open-popup" href="#size-chart">See size chart</a> {% endif %} - Add the following code to the bottom of the
product-template.liquidfile:Copy<div id="size-chart" class="mfp-hide"> {{ pages.size-chart.content }} </div> <style> #size-chart { border: 2px #555 solid; background-color: #ffffff; padding: 20px; max-width: 800px; margin-left: auto; margin-right: auto; } </style> - Click Save.
- In the Assets directory, click
theme.js. Add the following code to the bottom of the file:Copy$('.size-chart-open-popup').magnificPopup({ type:'inline', midClick: true }); - Click Save.
Tip
If the size chart isn’t appearing, you might need to add extra code to your theme. Because Magnific Popup is required for this customization to work, some themes, such as Debut, require that you complete the following steps.
- In the Assets directory, click to open your
theme.scss.liquidfile, or yourtimber.scss.liquidfile, and add this css to the bottom. - Do one of the following:
- Click Save.
Creating a size chart page
- Desktop
- iPhone
- Android
- From your Shopify admin, go to Online Store > Pages.
- Click Add page.
- Enter
Size chartfor the page title: - In the Content box, create a table that contains your size chart information. Customize the table to look the way you want it to:
- In the Visibility section, make sure the page is set to Visible.
- Click Save.
Creating a size chart snippet
- Desktop
- iPhone
- Android
- From your Shopify admin, go to Online Store > Themes.
- Find the theme you want to edit, and then click Actions > Edit code.
- In the Snippets directory, click Add a new snippet.
- Name your snippet
size-chart, and click Create snippet:
- In a new browser tab, open one of the following code snippets:
- Copy all of the code you see in the file.
- Return to your new
size-chart.liquidsnippet, and paste the code into the file: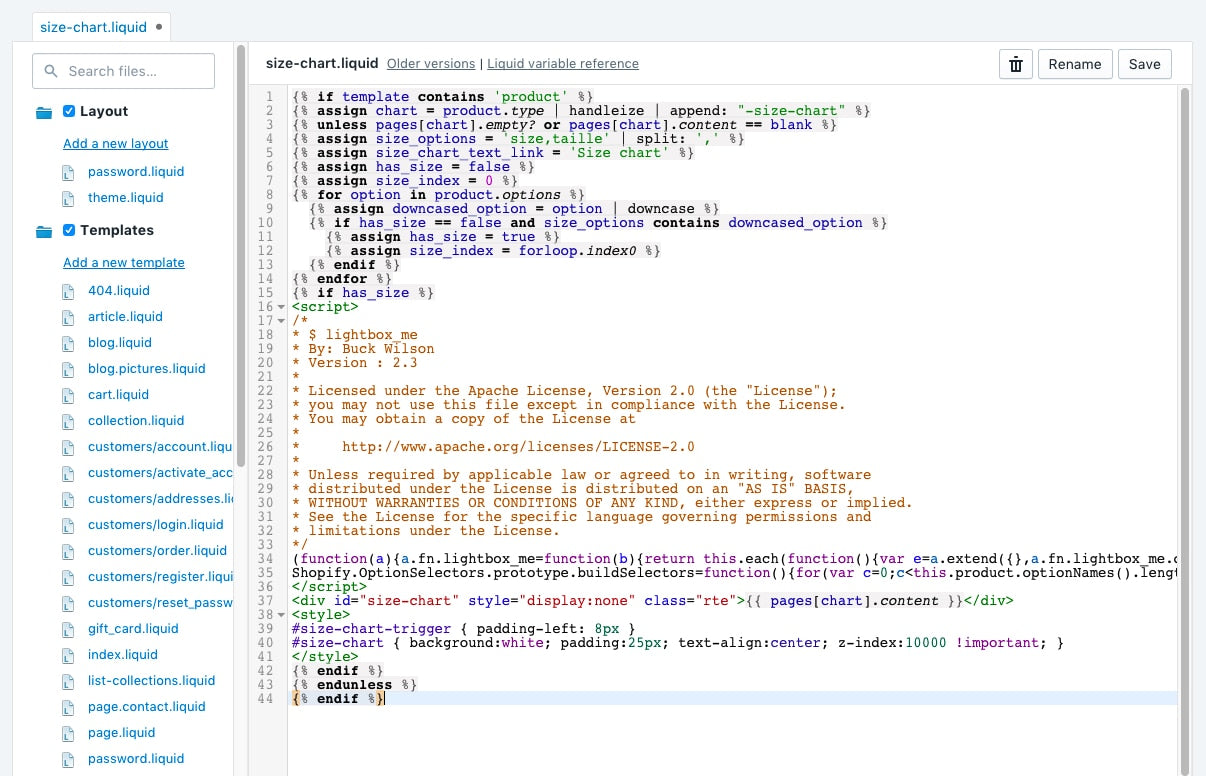
- Click Save.
- In the Layout directory, click
theme.liquid. - Find the closing
</body>tag. Right before the closing</body>tag, paste the following code:Copy{% render 'size-chart' %} - Click Save.
Setting up a size chart specific to a vendor or product type
If you selected a size chart specific to a vendor or product type, you will need to make a size chart for each vendor or product type. The process is the same as making a chart for the whole shop, except you need to put the vendor or product type at the beginning of the size chart page title and handle. For example, if you have a vendor called Great Owls, your size chart page would be named Great Owls Size Chart, and the handle of the page would be great-owls-size-chart:

If your size chart is for a product type, you might have a chart for product type shoes. You would then call your size chart page Shoes Size Chart, and the handle would be shoes-size-chart .
Using a different language or changing the ‘Size chart’ text
If your store’s operating language is not English, or you want to use different text than ‘Size chart’ on your product page, you can make these changes in your size chart snippet.
- Desktop
- iPhone
- Android
- From your Shopify admin, go to Online Store > Themes.
- Find the theme you want to edit, and then click Actions > Edit code.
- In the Snippets directory, click
size-chart.liquid. - Find
{% assign size_options = 'size,taille' | split: ',' %}. - Edit the
size_optionsvalues to match the translation you have for your product option. Separate each option value with a comma.For example, to add a German translation, you might change the code to:{% assign size_options = 'size,taille,Größe' | split: ',' %} - Find
{% assign size_chart_text_link = 'Size chart' %}. - Replace
Size chartwith the wording that you prefer. - Click Save.

Author: Nicole White
🧙♂️✨DESIGN MAGIC ✨🧙♂️ 👉@mediawizardstudios👈 💻 #Designer 🤓#Nerd 💍Taken - High School Sweethearts <3 🤟#4runner Canadian Located in Grande Prairie, #Alberta 🏡#GPAB 📓#PlannerAddict - I Love Passion Planners